
Our Let It Go Restorative Yoga class can be very helpful in relieving the stress of these challenging times. Restorative poses use props such as blankets, bolsters and pillows that are set up in just the right way to encourage your body (and mind) to drop into total relaxation.
Supported yoga postures offer the same benefits as non-supported poses but can be held longer and offer students an alternative way to practice. We recommend using a timer and holding each pose for 15 minutes. Holding the poses activates the parasympathetic nervous system.
Restorative postures should not hurt or create an “edge.” If any discomfort occurs rearrange the props or come out of the posture as directed.
Common places to check for tension are the lower back, abdomen, shoulders, neck, hips, knees, ankles and feet. Finding a place of absolute comfort can be difficult for those of us who, like myself are used to the idea of “no pain – no gain”. It can take a few attempts and you will need lots of props but with time you will discover the perfect set up for each pose. There is no need to purchase yoga props, just be creative! Cushions from chairs and sofas work well. Lots of different size pillows, rolled up blankets and towels will work, too. Remember to use as many props as needed to set yourself up. Just have them handy and experiment until you find the place where you are completely comfortable.
Be sure that your yoga space is warm, as it is harder to relax if you are cold. Cover the hands and feet. You may want to wear socks, add music or sound therapy and enjoy.
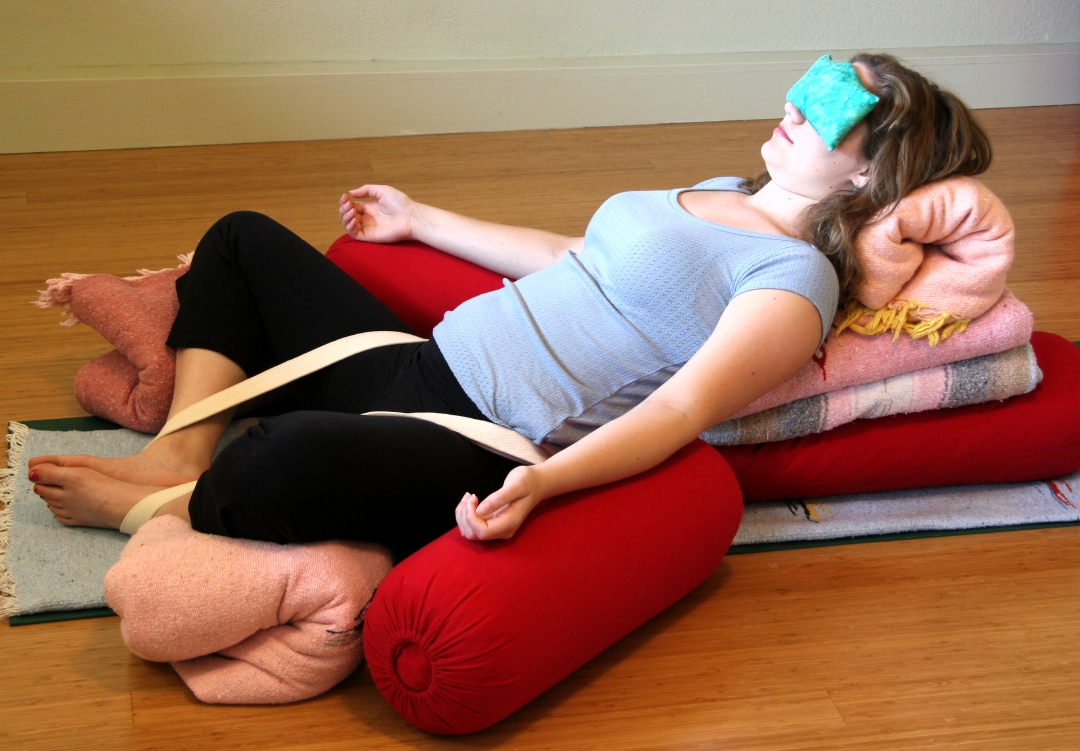
SUPPORTED BOUND ANGLE POSE
Props Needed: Bolster/Cushion, 5-6 Blankets, Strap or Belt, Eye pillow or Towel
Setting Up: Come to a seated position with the end of bolster touching the buttocks. Bend the legs and bring the soles of the feet together. Place strap around the lower back and loop around the ankles. Cinch strap to a comfortable position bringing the feet towards the groin. Place two folded blankets long ways on top of the bolster and an additional blanket folded in fourths for the head to rest on. Lie back, check to see that you are on a 45 degree angle and adjust blankets to support your needs, adding more blankets under the head if necessary. Allow the forehead to be higher than the chin. Place a folded blanket under each thigh to support the hips, keeping the knees at equal height. (Use this support even if you are very flexible). Place blankets under the length of each arm.
To come out of the pose: Press down with your arms and sit up. Release the strap. Help the thighs together with hands on outer thighs. Slowly release the legs and stretch. A gentle forward fold can counter the stretch.
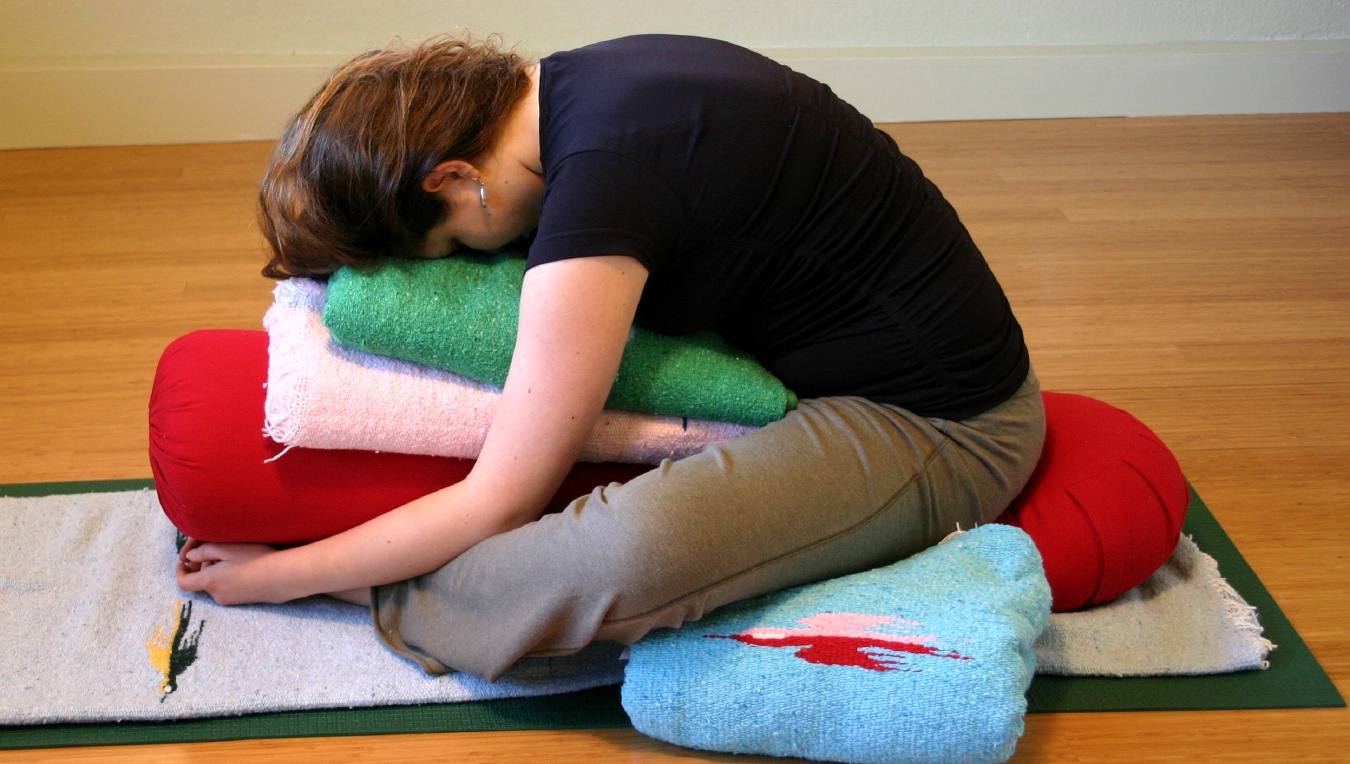
SUPPORTED CROSS LEG FORWARD FOLD
Props: Bolster, 2 – 4 Blankets, 2 Blanket Rolls
Setting Up: Sitting on the floor with the lengthwise bolster in front of you. Bring the soles of the feet together and gently fold over the bolster. Use as many blankets as necessary to fill in the space between the torso and the bolster. Support the outer thighs with blocks or blankets.
Release and relax completely into the support of the props. If you become uncomfortable adjust the height up or down. Breathe fully, encourage breath to open the ribcage and expand the lungs. If your head is turned to one side remember to turn to the other side at 7 1/2 minutes. Hold the pose for 15 minutes.
To come out of the pose: Press your hands into the bolster or floor to lift up the torso gently. Remove the bolster. Using the hands help bring your thighs together. Lie on your back and bring the knees to the chest for a counter stretch.
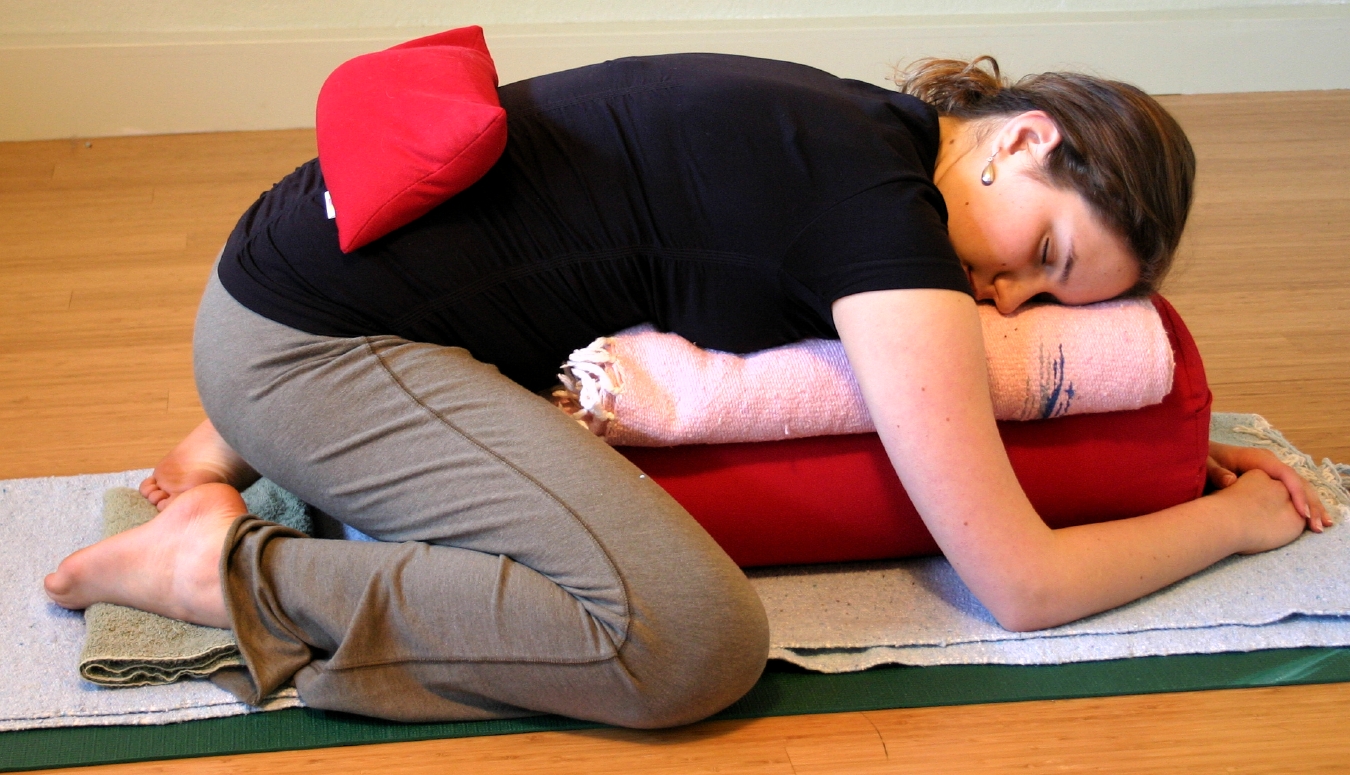
SUPPORTED CHILD’S POSE
Props Needed: Mat, Bolster /Cushion, 1 – 2 Blankets, Sandbag (optional)
Setting Up: Begin by kneeling on the floor with blanket over mat to protect the knees. Knees are wide apart with the bolster lengthwise in front of you. If knees are uncomfortable place a blanket between each calf and thigh. Lie over bolster resting your head to one side and forearms resting on the floor. If there is difficulty breathing push bolster forward and free the area of the abdomen. Adjust any area with blankets until you are completely comfortable. If you have a sandbag, place it on the lower back to encourage relaxation.
If knees, hips or ankles hurt, place blankets between the thighs and knees. Place blanket under forearms. Roll up the blanket under the ankles. Just relax and enjoy the nurturing position. Breathe into the lower back. Hold the pose for 7 1/2 minutes, turn your head to the other side and hold 7 1/2 minutes longer.
Coming out of the pose: Remove the sandbag. Place hands on the floor and push up gently.
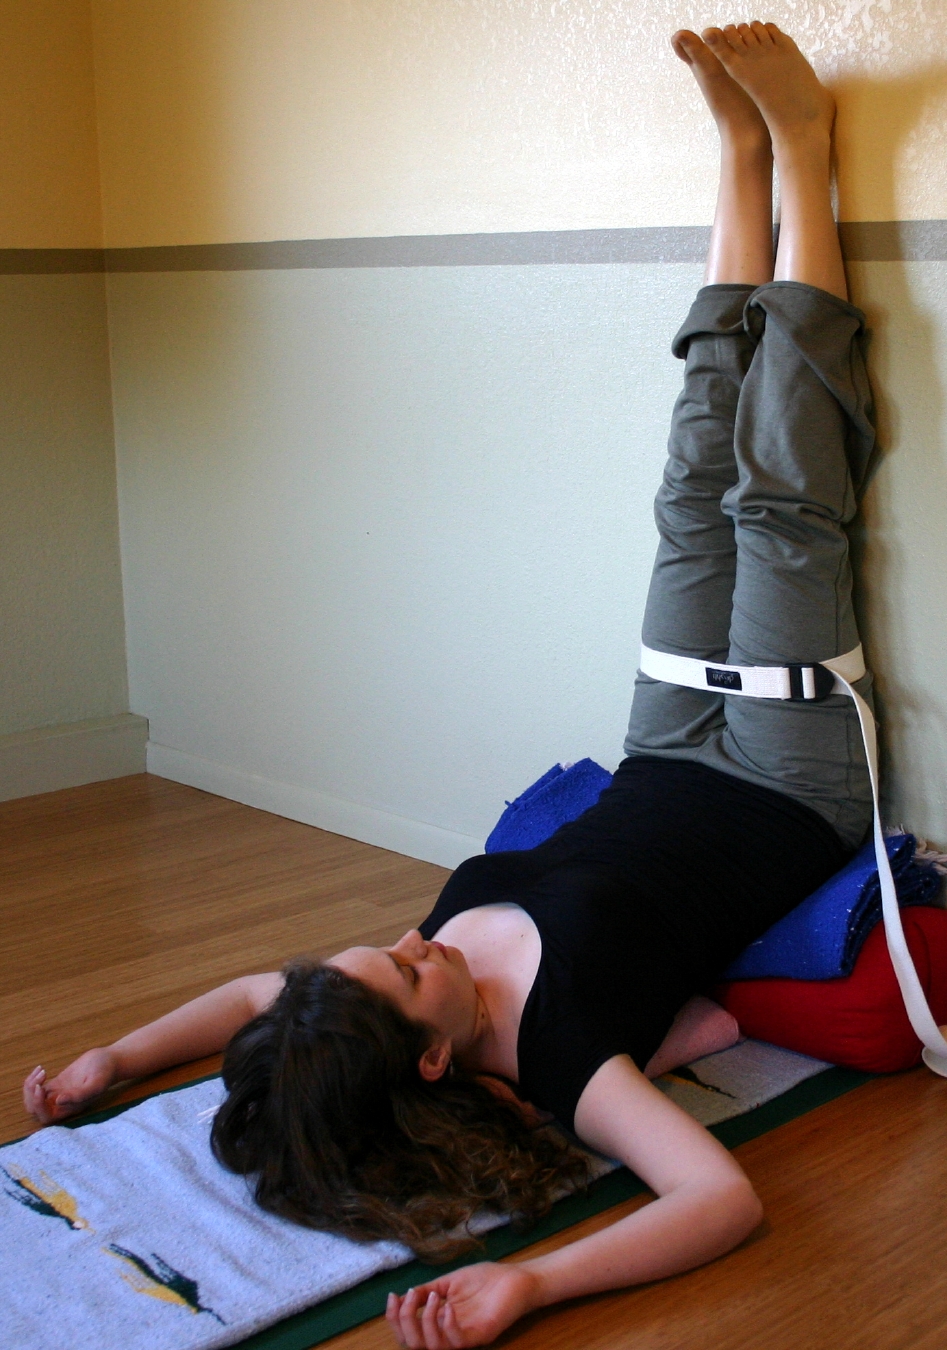
LEGS UP THE WALL
Props Needed: Bolster/Cushion, Mat, 3 – 4 Blankets, Hand Towel, Strap/Belt. Eye Pillow
Setting Up: Place the mat’s edge on the wall. Sit on the floor at the edge of the mat with right hip touching the wall. Lie back gently swinging your legs up the wall. The buttocks should touch or be as close as possible to the wall. To add back support, put your feet on the wall and lift the pelvis off the floor. Place the bolster under your lower back and adjust it until you feel completely comfortable. Add a strap around the thighs and secure the legs together. If there is any neck strain, place a folded blanket under your head.
Coming out of the pose: Place you feet on the wall and raise the hips so that you can slide the bolster out from under you. Hug your knees to the chest, remove the strap, roll to the right side and come up using the strength of your left arm
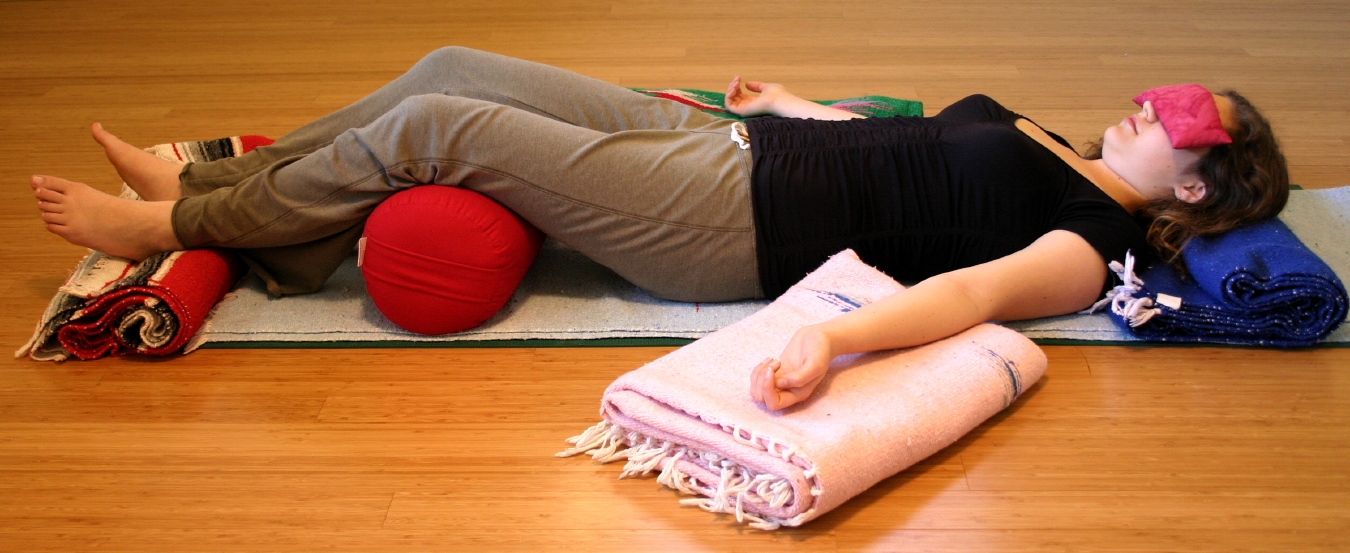
CORPSE POSE – SAVASANA
Props Needed: Mat, 2-7 Blankets, Eye Pillow/Towel, Bolster or Rolled Blanket
Setting Up: Approaching the pose from a side position is recommended rather than lying straight back. Slide a rolled blanket or bolster under the knees. Place a folded blanket under your head. Be sure your chin is lower than the forehead. Place a rolled blanket under the heels. Place a blanket under each arm. Place eye pillow over eyes. Cover yourself with blanket to stay wa
rm.
Coming out of the pose: To come out bend one knee up into chest and then the other. Place the right hand under the nape of your neck, place the left hand on the left knee and roll gently to the right side into a cradle position. Breathe. Place the left hand on the floor in front of the body and use the strength of your left arm to help you sit up. Do not sit up directly from prone position.
When coming out of the pose, please remember to move slowly. Fast movements will shock the nervous system and dissolve the benefits of the practice.
Mostly enjoy each pose. You can practice one or two or, if you have the time, all four would make a complete practice.
Remember to say Thank You to yourself for taking such loving care of your body (and mind).
Namaste!
Leave A Comment